Implementing Zero Trust Network Access with Twingate on Azure
Introduction
If you’ve ever wrestled with a VPN, you know it’s like trying to fit a square peg into a round hole in today’s digital workspace. Sure, VPNs encrypt your data and mask your IP, but they’re like throwing a heavy, one-size-fits-all cloak over your network access needs. It’s time for a change. It’s time for a smarter, more tailored approach to security. Enter the hero of our story: Zero Trust Network Access (ZTNA).
At its core, ZTNA isn’t just another tech acronym to remember; it’s a fundamentally different way of thinking about security. Unlike VPNs, which grant broad network access once you’re in, ZTNA is like a savvy bouncer, checking your ID at every door, making sure you only get into the rooms you’re supposed to.
Granular Control with Zero Trust
ZTNA operates on a simple, yet powerful principle: “Never trust, always verify.” It’s not about where you are; it’s about who you are and what you’re allowed to see. ZTNA gives you granular control over application access, continuously monitoring user activity and ensuring that only authenticated users and devices can access specific applications. This means every session, every access request, is scrutinized—keeping the internal network veiled from prying eyes.
One of the most significant drawbacks of VPNs is their “trust but forget” approach. Once you’re in, you’re in. ZTNA, on the other hand, is like a vigilant guardian. It continuously verifies the trustworthiness of users and devices, ensuring that access permissions are always up to date. By granting access only to the web-portal frontend, ZTNA minimizes cyber risk far more effectively than VPNs can hope to.
Remember the last time you tried accessing something through a VPN, and it felt like wading through molasses? ZTNA changes the game by connecting users directly to private applications. This direct access model not only tightens security but also makes for a faster, smoother user experience. No more unnecessary detours—just straight, secure access to the applications you need.
Project Overview
This is just a quick overview of what this project will detail.
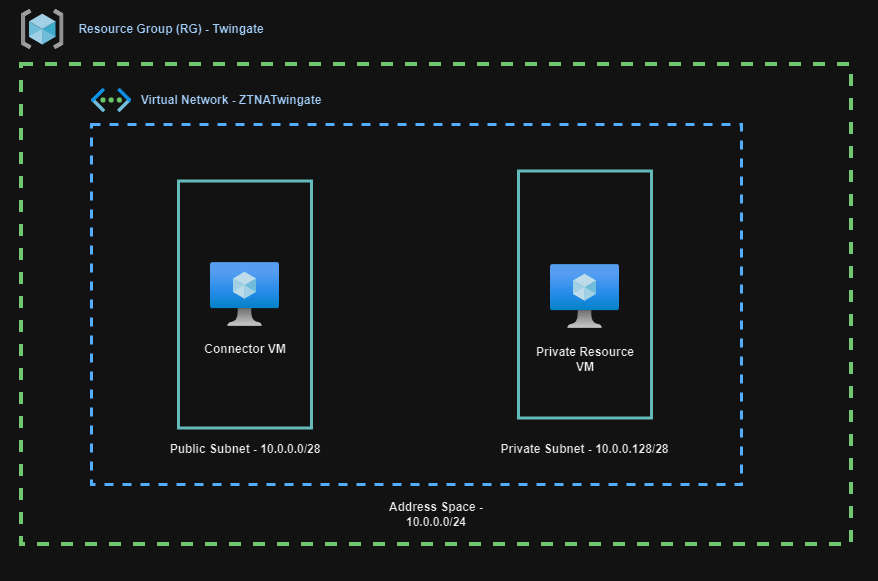
Set Up a Resource Group: Start by creating a Resource Group (RG) in Azure. This organizes all your project components in one location.
Create a Virtual Network: Within your RG establish a virtual network. Divide this network into two subnets:
Public Subnet: Deploy the Twingate Connector VM here. It acts as the secure gateway for authorized access.
Private Subnet: Place your Private VMs here, which will be accessible securely through Twingate.

Setting up Our Azure Enviroment
Resource Group Creation
Go to the Azure Portal: Use the search bar at the top to find Resource Groups.
Create a New RG: Click the Create button on the Resource Groups page.
Fill in the Details: Enter a name for your RG, select your subscription, and pick a region.
Review and Create: Check your details, then hit Create to establish your RG.

Virtual Network Creation
After setting up your Resource Group, the next step is to create a Virtual Network and the subnets within it.
Navigate in Azure Portal: Look up Virtual networks in the search bar and select it.
Initiate Virtual Network Creation: Hit Create. Pick the Resource Group you’ve previously created.
Configure Network Details: Assign a name to your network, Test is what I named mine

Add the Subnets: Go to the IP Addresses section, choose + Add a subnet. Assign an address range for the Public Subnet and an address range for the private subnet. On the Private Subnet ensure that Enable private subnet is selected.

Double Check: Review your settings and click Save to create your subnets.
Setting Up Virtual Machines in Azure: Connector and Private VM
After your Resource Group and Virtual Network are ready, it’s time to set up the key components of our project: the Connector VM and the Private VM.
Creating the Connector VM
Find Virtual Machines: Head to the Azure Portal, search for Virtual machines, and click Create to begin.
Select Your Resource Group: Pick the Resource Group you made earlier.
Name Your VM:
Choose an OS Image: Select Ubuntu as the Image OS

Double Check: Ensure all selected options, including disk and storage sizes, fall within the Azure free tier limits to keep the project cost-effective.


Finalize VM Setup: Double-check networking settings to connect the VM properly to your Virtual Network.
Setting Up the Private VM with Jenkins
For the Private VM setup, follow the same steps as you did for the Connector VM, with two key adjustments: ensure the Public IP option is set to None, and when selecting the VM’s OS image, search for and choose Jenkins.

Twingate Setup
Begin by creating a free Twingate account. During the initial setup, you’ll be guided to creating a unique network name and URL.

Once inside the Twingate dashboard, the next move is to add a Remote Network. This involves choosing Azure as the location and giving your network a name.


With the network created, proceed to install the Twingate client. This client connects to your newly created remote network, bridging your local environment to your secure cloud setup.


Establishing the Connector VM
Access the Connector VM via SSH. Once in, deploying the Twingate connector is straightforward. Simply select Linux as the deployment method to match the Ubuntu operating system of the VM, then execute the installation command provided in the Twingate setup guide. Completion is indicated by a green dot next to your connector in the Twingate interface.


Integrating the Private Jenkins VM
Back in the Twingate dashboard, it’s time to add your Private Jenkins VM as a resource by specifying its private IP address. For this demo, access permissions were set to “everyone.” You can customize access to be as specific as you need.


Accessing the Private Jenkins VM
With the setup complete, the Twingate client on your Windows system now lists the Private Jenkins VM, enabling secure navigation to its services. To view this, navigate to Twingate in your icon tray and right click it to see your resource.


The Shift Towards ZTNA
The landscape of network security is shifting. We’re moving away from the wide-reaching access of traditional VPNs to the more precise approach of Zero Trust Network Access (ZTNA). Twingate is one of many tools out there that are prioritizing how we access resources in our networks. ZTNA alters our approach to connectivity, placing emphasis on verification and continuous monitoring of each access attempt. By adopting ZTNA, we’re navigating towards a future where the expectation is not just for more secure access, but for a more widely adopted approach compared to traditional VPNs, acknowledging that while any system may have vulnerabilities, the shift towards ZTNA reflects our evolving priorities in network security.
Sharing is caring!